Fintech is highly regulated segment in every country. Bangladeshi fintech is also the same which becomes a major constraints in leveraging latest technology capacity. One of the top 2 Banks in Bangladesh were also very keen to leverage the cloud service capacity to manage their internal developed projects. In that direction, they wanted to have CI/CD capacity for all of their internal projects. Since all of their resources are in private network capacity, a number of challenges came up which are not applicable for standard environment. I have shared few challenges below:
- No internet access to the environment and they won’t allow the internet for any case in this CI/CD process
- No access to the client’s servers by us.
- On-premise outdated gitlab repo servers
- Their existing deployment process is completely manual
To address the above challenges, we had to align all the activities which are aligned with their compliances/restrictions.
A step by step process has been prepared below:
Step 1: Create an IAM user for the on-premises instance.
Create an IAM user that the on-premises instance will use to authenticate and interact with CodeDeploy. No need to apply for any permission at this stage.
Step 2: Assign permissions to the IAM user
Assing the following AWS managed policies to the newly created user.
- AWSCodeDeployFullAccess
- AmazonS3ReadOnlyAccess
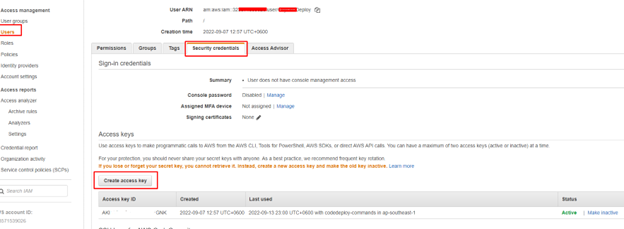
Step 3: Create Access Key and download it like below
Step 4: Add a configuration file to the on-premises instance
Add a configuration file to the on-premises instance, using root or administrator permissions. This configuration file will be used to declare the IAM user credentials and the target AWS region to be used for CodeDeploy. The file must be added to a specific location on the on-premises instance. The file must include the IAM user’s ARN, secret key ID, secret access key, and the target AWS region. The file must follow a specific format.
- Create a file named codedeploy.onpremises.yml in the following location on the on-premises instance: /etc/codedeploy-agent/conf
- Use a text editor to add the following information to the newly created codedeploy.onpremises.yml file:
—
aws_access_key_id: secret-key-id
aws_secret_access_key: secret-access-key
iam_user_arn: iam-user-arn
region: supported-region
3. Under the following directory (/etc/codedeploy-agent/conf) edit codedeployagent.yml file and set proxy URL as below
:proxy_uri: https://username:password@proxy-domain-name:proxy-port
Step 5: Install and configure the AWS CLI
- Install AWS CLI from here.
- Configure AWS CLI as below
aws configure
AWS Access Key ID [None]: you access key Id
AWS Secret Access Key [None]: your secret key
Default region name [None]: supported-region
Default output format [None]: json
Step 6: Set the AWS_REGION environment variable
export AWS_REGION=supported-region
Step 7: Install the CodeDeploy agent
Install the CodeDeploy agent on the on-premises instance:
For ubuntu:
sudo apt-get update
sudo apt-get install ruby2.0 (Ubuntu Server 14.04) or sudo apt install ruby-full (16.04 or later).
sudo apt-get install wget
cd /home/{username}
wget https://aws-codedeploy-{region}.s3.amazonaws.com/latest/install
chmod +x ./install
sudo ./install auto (Ubuntu Server 14.04, 16.04, and 18.04)
or sudo ./install auto > /tmp/logfile (for Ubuntu 20.04).
For Amazon Linux or RedHat
sudo yum update
sudo yum install ruby
sudo yum install wget
wget https://aws-codedeploy-{region}.s3.amazonaws.com/latest/install
chmod +x ./install
sudo ./install auto
Step 8: Register the on-premises instance with CodeDeploy from your local machine.
You need to install and configure AWS CLI on your local machine and your user must have the required permission to register the on-premises instance and tag it.
Find out the ARN of the user you have created in step 1 and register the deploy using the following command:
aws deploy register-on-premises-instance –instance-name AssetTag12010298EX –iam-user-arn arn:aws:iam::444455556666:user/CodeDeployUsername
Step 9: Tag the on-premises instance
You can use either the AWS CLI or the CodeDeploy console to tag the on-premises instance. (CodeDeploy uses on-premises instance tags to identify the deployment targets during a deployment.)
If you want to register from the CLI, use the following command
aws deploy add-tags-to-on-premises-instances –instance-names AssetTag12010298EX –tags Key=Name,Value=CodeDeployDemo-OnPrem
Step 11: Track deployments to the on-premises instance
After you deploy an application revision to registered and tagged on-premises instances, you can track the deployment’s progress.
Networking
Client needs to ensure the following:
- Client’s internal Gitlab server can access AWS over site-to-site VPN
- Target deployment server (where code deploy agent will be installed) can access AWS over site-to-site VPN
- Target deployment server (where code deploy agent will be installed) can access proxy server hosted on AWS (IP: 10.35.5.30, PORT: 3128) over site-to-site VPN
- Internet access on Target deployment server to install code deploy agent and AWS CLI
VPC configuration:
- Configure VPC named as ‘VPC The CBL’ taking IP address block from Client On-premise end. IP address 10.35.5.0/24
- Create 4 subnets in two Availability zones and define their IP address.
- VPC The CBL – Private – AZ1 10.35.5.0/28
- VPC The CBL – Public – AZ1 10.35.5.16/28
- VPC The CBL – Private – AZ2 10.35.5.32/28
- VPC The CBL – Public – AZ2 10.35.5.48/28
- The default route table defined and renamed as private route table and associate it to all private(two) subnets.
- VPC The CBL – Private – AZ1 10.35.5.0/28
- VPC The CBL – Private – AZ2 10.35.5.32/28
- Create public route table and associate it to all public subnets
- VPC The CBL – Public – AZ1 10.35.5.16/28
- VPC The CBL – Public – AZ2 10.35.5.48/28
- Create Internet gateway (IGW) attached to VPC
- Add a route in public route table for destination 0.0.0.0/0 select target IGW.
AWS to The Client On-premise Site-to-Site VPN configuration:
- Create file for VPN checklist and take input from BS23 and The Client On-premise end.
- Create Customer gateway named as The CBL CGW with IP address 103.29.105.4.
- Create Virtual Private gateway named as The CBL VGW and attached to VPC The CBL.
- Configure Site-To-Site VPN name as AWS-To-The CBL using bellow information:
- Target gateway type –> Virtual private gateway–>The CBL VGW
- Customer gateway–> Existing—> The CBL CGW
- Routing options —>Static and add Static IP prefixes —> 192.168.98.16/28
- Local IPv4 network CIDR –> 192.168.98.16/28
- Remote IPv4 network CIDR–> 10.35.5.0/24
- Download the configuration file for Cisco Firepower ikev1 and share it with the client Team.
- Enable route propagation for both private and public subnets.
Configure VPC endpoint for accessing AWS CodeCommit :
- Create endpoint as
- Name tag: AWS CodeCommit
- Service category: AWS services
- Filter Services: com.amazonaws.ap-southeast-1.git-codecommit
- Select VPC: The CBL VGW
- Select private Subnets:
- ap-southeast-1a (apse1-az1)
- ap-southeast-1b (apse1-az2)
- IP address type: IPv4
- Security groups: AWS CodeCommit configured as all inbound and outbound traffic allow.
- From Additional settings
- Select: Enable DNS name
- DNS record IP type: IPv4
- Policy: full access.
VPC endpoint for AWS CodeCommit: vpce-07bec13f9640d9eee-yrnxfw8a.git-codecommit.ap-southeast-1.vpce.amazonaws.com
Launch an EC2 instance for creating proxy server:
Install Squid and configure Proxy server:
- Install Squid.
root@prox:~# apt -y install squid
- This is common forward proxy settings.
root@prox:~# vi /etc/squid/squid.conf
- acl CONNECT method CONNECT
# line 1209: add (define ACL for internal network)
acl my_localnet src 192.168.98.16/28
- # line 1397: uncomment
http_access deny to_localhost
- # line 1408: comment out and add the line (apply ACL for internal network)
#http_access allow localhost
http_access allow my_localnet
- # line 5611: add
request_header_access Referer deny all
request_header_access X-Forwarded-For deny all
request_header_access Via deny all
request_header_access Cache-Control deny all
- # line 8264: add
# forwarded_for on
forwarded_for off
- root@prox:~# systemctl restart squid
Set Basic Authentication and limit Squid for users to require authentication.
- Install a package which includes htpasswd.
root@prox:~# apt -y install apache2-utils
- Configure Squid to set Basic Authentication.
root@prox:~# vi /etc/squid/squid.conf
- acl CONNECT method CONNECT
# line 1209: add follows for Basic auth
auth_param basic program /usr/lib/squid/basic_ncsa_auth /etc/squid/.htpasswd
auth_param basic children 5
auth_param basic realm Squid Basic Authentication
auth_param basic credentialsttl 5 hours
acl password proxy_auth REQUIRED
http_access allow password
- root@prox:~# systemctl restart squid
- # add a user : create a new file with [-c] option
root@prox:~# htpasswd -c /etc/squid/.htpasswd bs23
New password: # set password
Re-type new password:
Adding password for user bs23
Proxy server information:
IP: 10.35.X.X
port: 3128
user: username
pass: password
The above process helped the client to have better efficiency and predictable flow in their DevOps process.
